Houston isn't kind to outdoor spaces. Between high heat, heavy humidity, surprise storms, and bugs, choosing the right aluminum patio cover is the difference between a space you love and one you avoid. In this guide I'll show you what truly works in our climate—how to get real shade and airflow, how to keep water where it belongs, and how to plan posts/anchors for 120-mph winds. I’ll also walk you through budget, warranty, permits/HOA, financing, and a realistic 4 to 5 business day build timeline so you know exactly what to expect.
Houston Weather Problems You Must Solve First
Heat + humidity + sun orientation
Houston’s heat load is intense, especially on west- and south-facing patios. Your cover should target shade where the sun hits hardest while preserving enough airflow to feel cooler. We start by mapping your orientation (morning vs. afternoon sun) and nearby surfaces that radiate heat—pool decks, driveways, and brick walls.
Pollen, salt air & bugs (comfort + finish)
Seasonal pollen and coastal aerosols can dull finishes and clog gutters; mosquitos make summer evenings rough. Aluminum’s powder-coat finish resists corrosion and cleans up easily, and we can integrate screens or motorized shades to block pests and add privacy without closing off airflow.
Internal link: See our thoughts on aluminum vs other materials in Are Aluminum Pergolas a Good Choice?
Shade & Airflow: Getting the “Feels Cooler” Effect
Target shade percentages & panel choices
For most Houston patios, aim for strong overhead coverage during peak hours. Solid aluminum roof panels provide consistent shade; insulated panels further reduce heat transfer and rain noise—ideal near living rooms or outdoor kitchens.
Fan sizing and placement for covered patios
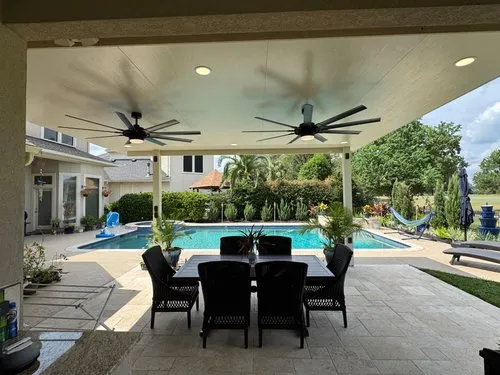
Fans matter as much as shade. We size fans to your footprint and height, then place them to move air across seating zones (not just straight down). Because electrical is done in-house, we hide conduit for a clean look and safer install.
Internal link: Explore Attached Aluminum Patio Covers and Freestanding Aluminum Patio Covers
Solid vs. Insulated Roof Panels (and When to Use Each)
Noise, temperature, and lighting trade-offs
Non-insulated panels are lighter and budget-friendly. Insulated panels add rigidity, reduce heat gain and damp rain noise—a smart pick near bedrooms or where you’ll entertain year-round. Either way, we plan lighting and fan boxes up front so the roof layout looks intentional.
Best pairings with kitchens, pools, and tight spaces
• Outdoor kitchens: Insulated roofs plus proper hood/venting keep smoke from trapping under the cover. • Pools: Freestanding layouts allow open circulation and better splash control. • Tight driveways: Cantilever beams create clear space without extra posts.
Internal links: Modern Outdoor Kitchens · Traditional Outdoor Kitchens · Cantilever Aluminum Pergola / Carport
Attached vs. Freestanding vs. Cantilever: Which Fits Your Lot
Roof tie-in basics for attached covers (flashing & slope)
Attached covers integrate to your roofline. We use proper flashing and pitch to keep water out, route it into gutters, and avoid backflow into fascia or siding. This is where pro detailing prevents leaks long-term.
Site planning for freestanding backyard rooms
Freestanding covers shine when you need a second “room” away from the house (poolside lounge, dining pavilion). We position posts to frame views, plan traffic paths, and run concealed power to lights, heaters, and fans.
Cantilever solutions for driveways & carports
Cantilever structures deliver big shade with minimal posts—perfect for driveways where door swing and turning radius matter. Engineered beams shift load back to anchors and footings so you keep usable space.
Internal links: Attached · Freestanding · Cantilever
Built for Wind: What 120 mph Engineering Really Means
Posts, anchors, and footing depth logic
A 120-mph rating isn’t just a number—it’s a set of decisions about post size, spacing, anchor type, and footing depth based on exposure and soil. In practice, we: • Right-size posts and beams for span and height • Use anchors designed for uplift, not just gravity • Pour footings deep enough for local soils (expansive clays, pool decks, etc.)
Quick post-storm inspection checklist
After a major storm, do a 2-minute walk-around: check post bases and brackets, make sure gutters/downspouts aren’t blocked, and look for any loose fasteners or panel movement. If something looks off, call us—we’ll evaluate and advise.
Internal link: Maintenance tips in Aluminum Pergola Maintenance
Drainage That Prevents Stains and Puddles
Gutter sizing and downspout routing
We size gutters to your roof area and route downspouts so water exits away from slabs and flower beds. Elbows, extensions, or French drains keep water from bouncing back onto walls or pooling near posts.
Concrete grades and lawn transitions
Small grading tweaks matter. If you’re pouring a new slab or refreshing turf, we’ll coordinate slope so water runs cleanly off the cover edge.
Internal link: Pair with Concrete & Turf Installation
Comfort Upgrades That Work in Humidity
Fans, heaters & misters: what actually performs
• Fans: Bigger diameters at moderate RPMs move air quietly. • Heaters: Place clear of combustible materials and high-traffic areas. • Misters: Great for hot afternoons; pair with mineral control to reduce spotting.
Clean, hidden electrical (done in-house)
Our crew handles electrical in-house, hiding conduit and planning circuits for lights, fans, and heaters. You get a tidy finish and safer operation.
Budget, Warranty & Financing—Quick Overview
Typical project starting points
Projects typically start from $6,000, and scale with footprint, roof type (insulated vs non-insulated), electrical scope, and site conditions.
5-year workmanship & materials (electrical excluded)
You’re covered for 5 years on workmanship and materials for fabrication/finish issues. Electrical components are excluded. Weather extremes, misuse, or third-party alterations are also excluded—ask for full terms.
Financing available through trusted partners
Prefer payments? We offer financing through our partners (subject to approval). We’ll walk you through pre-qualification and timelines so your project can move forward comfortably.
Timeline & Process: From First Call to Build
Phone ballpark → site visit → 3D + formal quote
Start with rough measurements/photos to receive a ballpark. If it fits your budget, we schedule an on-site visit, take precise measurements, and prepare a 3D rendering + formal quote so you can see the design before we build.
Permits & HOA (we advise; you file) + 4 to 5 business-day build
We prepare the documents and engineer-stamped plans when required. You submit and pay city/HOA fees. Once approvals and deposit are in, we schedule. Typical build time is 4 to 5 business days depending on scope and weather, followed by a final walkthrough and care tips.
Internal link: Full list of services at our Outdoor Living Services Hub
Internal link: Compare cover types in Best Patio Cover Types and structures in Covered Patio vs. Pergola
Where We Work in Houston & Austin
Houston metro
Katy, The Woodlands, Sugar Land, Cypress, Pearland, League City, Spring, Humble, Pasadena, Baytown, Missouri City, Richmond, Tomball, and more within ~80 miles of Houston.
Austin metro
Round Rock, Cedar Park, Georgetown, Pflugerville, Leander, Lakeway, Kyle, Buda, Hutto, and surrounding communities.
Ready to Design Your Shade?
We build custom, from-scratch aluminum covers with premium finishes, engineered to perform in Houston and Austin. Whether you need an attached extension of your living room, a freestanding backyard room, or a cantilever carport for tight driveways—we’ll help you choose the right fit and make it look like it has always been part of your home.